Partner, Oppenheim Architecture and Design
At Cube, a 24 story condominium project in the Design District in Miami Florida shown below, we are using an exposed steel structural frame. In Archicad 9, the exterior steel structure of the building was generated using the add-on application, TrussMaker. I was going to demonstrate how this was done, but now with ArchiCAD 10, it is no longer necessary to use this tool for this purpose. I will show how a portion of this repeating structure can be modeled in ArchiCAD 10.

First, set up a folder in the View Map where the relevant views for this modeling exercise can be accessed rapidly. Give it a descriptive name and using the Organizer, drop a floor plan, a study section and a perspective view, so you can quickly move between these.
Larger image

In ArchiCAD 10, the profile of a beam can be specified before modeling it with the Beam tool. Access the Beam Selection Settings dialog, click on the Profile icon, and select the profile HP Steel Section. Draw a couple of beams in the floor plan view; we will be moving these later to the correct location in the plan and elevation views. Do the same with the Column tool.

Larger image
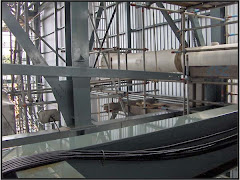
Going to the study section view, we can see the library part that was originally done with TrussMaker and is now going to be replaced by elements created directly with the Beam tool. We can see the horizontal beam, the sloping beam, and the column, both in the section view as well as in the perspective view.
Larger image

Larger image
We will now move, mirror and copy, and stretch the beams and columns to the desired location in the section view as well as the plan view.
Larger image

Larger image
Next, we remove the TrussMaker library parts and replace them with the new elements.
Larger image

The next step is to make two more copies of the horizontal beam and move them to their proper location. They will now show in their corresponding story automatically. You can see the results better in the 3D view.
Larger image

These new beams now have to be moved them to their correct location in the plan view.
Larger image

The 3D view shows that they are now placed correctly.
Larger image
Select your view point and render to see the results in a more photorealistic manner.
Larger image
This basic frame can now be copied to other portions of the building that are identical, or the process can be repeated to create structural elements for the other parts of the building that are similar but not identical.
About the Author
Carlos Ramos is registered to practice architecture in the state of Florida, and a partner in Oppenheim Architecture and Design. He has been using ArchiCAD since version 6.5.